Lesson 10 - Calculations and Masking, and Photoshop Special Effects
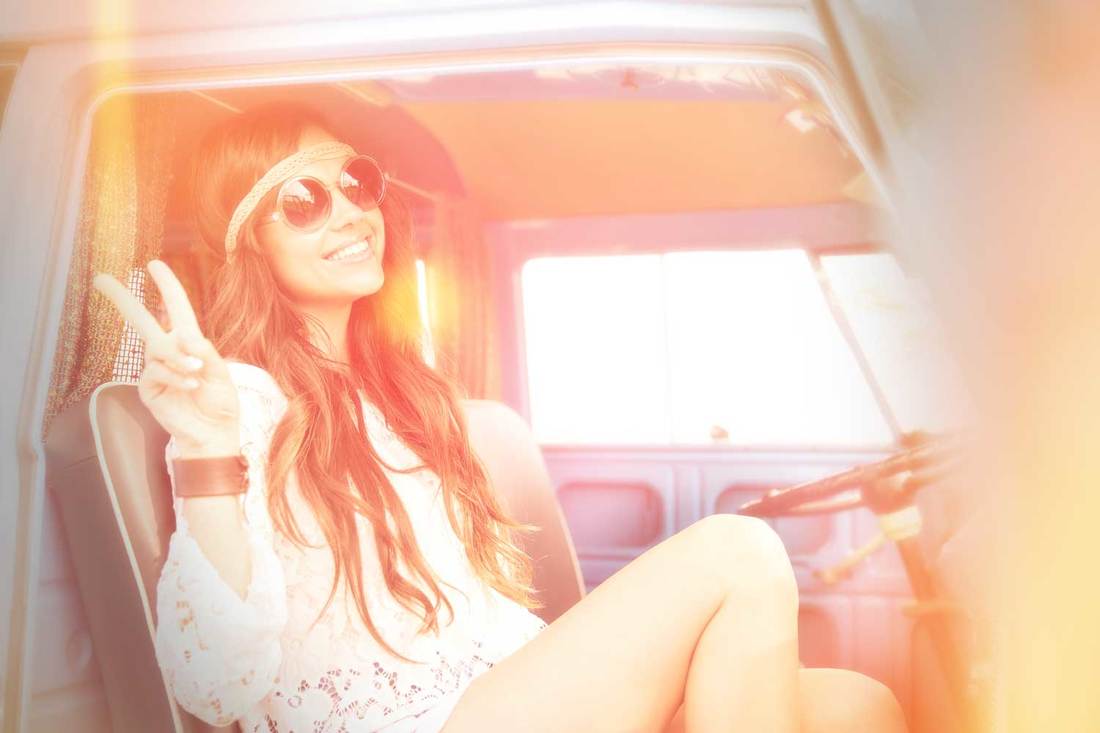
Wanting to explore the endless filters and adjustment Photoshop offers, I decided to create a retro image through applying the 'light-leak' effect. I found this particular effect to make any image appear vintage and me wanting summer even more.
Photoshop Skills Used:
Design Thoughts:
Resources:
Image Source: Adobe Stock Images
Video Tutorial: http://www.digitalartsonline.co.uk/tutorials/photoshop/create-retro-photos-in-photoshop/#3
Photoshop Skills Used:
- Layer > New Adjustment Layer > Curves
- Layer > New Adjustment Layer > Levels
- Layer > New Adjustment Layer > Color Balance
- Layer > New Adjustment Layer > Hue/Saturation
- Brush Tool + Mask
- Duplicate + Merge Layers
- Blur > Gaussian Blur
- Eraser Tool
- Blur > Motion Blur
Design Thoughts:
- To make the image appear faded, I applied a New Adjustment Layer > Curves and altered the RGB, red, and blue curves.
- Reduced the black (level 42) output level by the levels adjustment to drop the contrast and make the entire image appear washed-out.
- Color Balance adjustments: Midtones: magenta-green -8; Shadows: +25, -2, -11; Highlights: +12, -21, -25. Color balance adjustments emphasized the red and magenta tones; therefore, adding warmth to the image.
- Hue/Saturation, to restore contrast, was changed to the following: Hue: 28; Saturation: 37; and Lightness: -10. (Clicked colorize tickbox)
- Used the Brush Tool and soft black paint to allow previous layer to show through.
- Duplicated and Merged all layers together. Then, desaturated the image and applied Filter > Blur > Gaussian Blur at radius of 20 px. Layer’s blending mode was changed to Soft Light, opacity 100%.
- Duplicated and Merged all the layers again, but then applied Filter > Blur > Gaussian Blur with 20 px radius again. Blending mode was set to Screen. Used the Eraser Tool to delete areas over the model.
- Added a new layer and filled it with black. Blending mode was changed to Linear Burn, 30% opacity. Then, the brush tool was used to paint over the middle of the image, leaving a vintage effect.
- Added a new layer, used the Brush Tool and painted soft red blobs in each corner. Added another new layer, used the Brush Tool and painted soft yellow blobs in the middle of each red blob. Once finished, I applied the following filters: Filter > Blur > Motion Blur, Distance completely to the right and 90 degrees for the angle.
- Grouped the two previous layers together and changed the blending mode to Screen to create a light leak effect. These last two steps were repeated to get desired results.
Resources:
Image Source: Adobe Stock Images
Video Tutorial: http://www.digitalartsonline.co.uk/tutorials/photoshop/create-retro-photos-in-photoshop/#3
